How to Map and Write Amigurumi Assembly Instructions
A finished amigurumi can look simple on your craft table and become confusing the moment you turn it into a pattern. The difference is assembly. Learning how to map pattern assembly gives every separate piece a defined place, order, angle, and purpose before a customer starts sewing.
That matters because your buyer cannot see the character the way you do. They are working from written rounds, photos, and their own tension. A strong assembly map closes the gap between your original sample and the project they finish at home. It also reduces tester questions, prevents vague instructions, and makes your PDF feel like a product built for success.
Start With the Finished Character, Not the Written Rounds
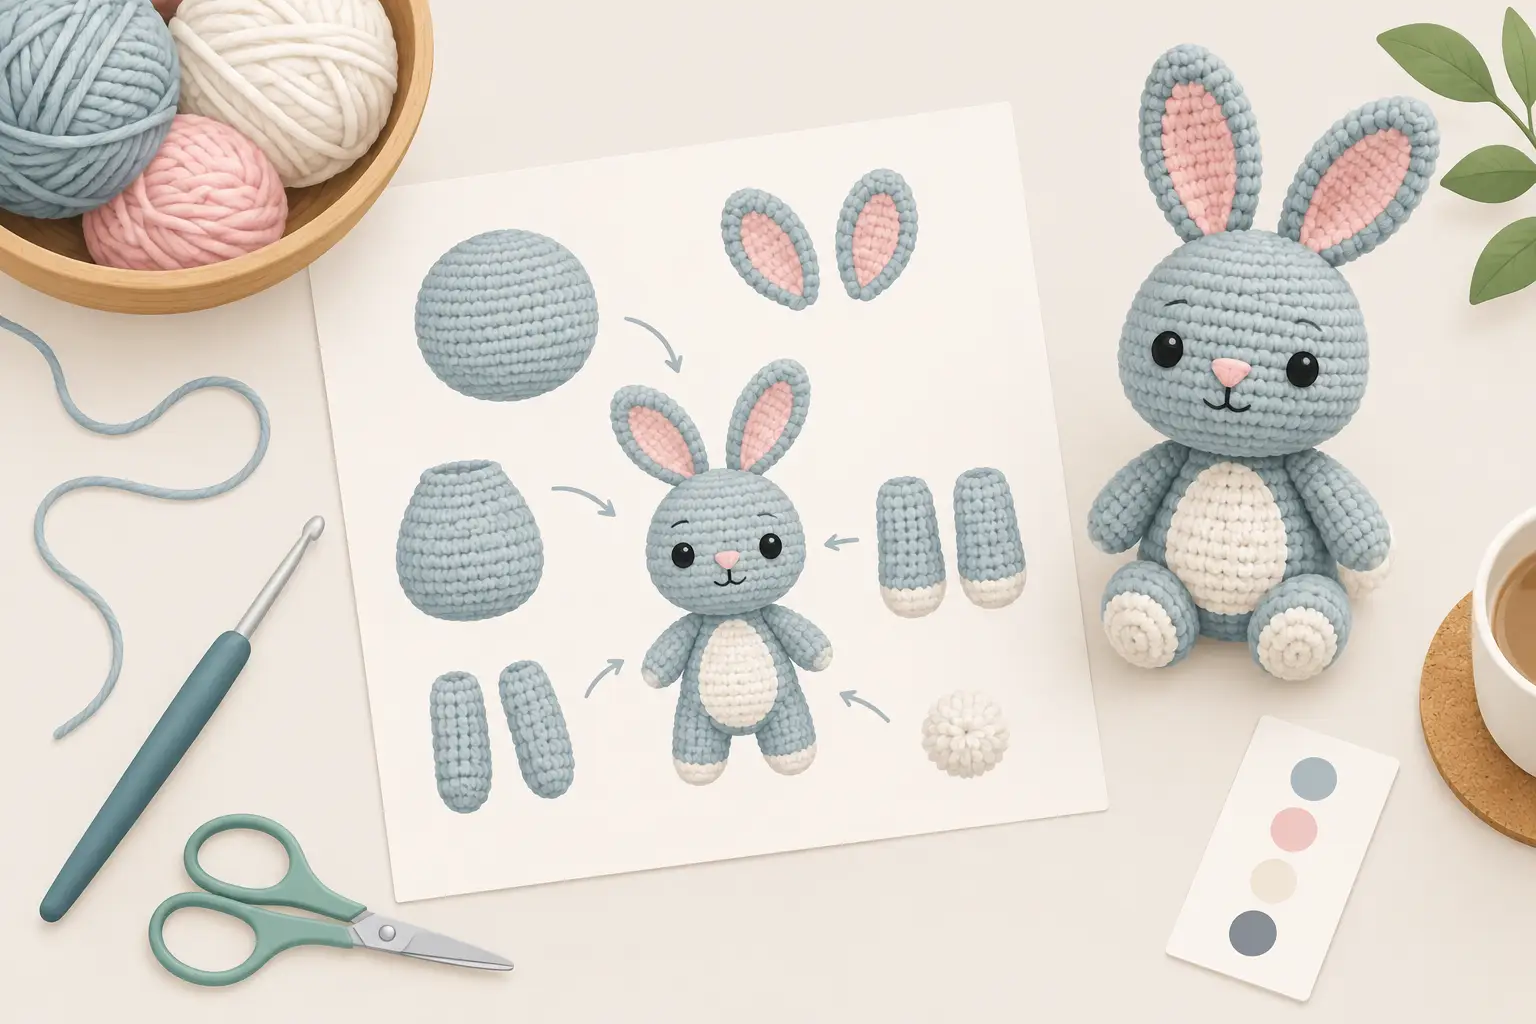
Before writing an assembly section, inspect the completed amigurumi as a set of connected components. Put it in front of you, rotate it, and identify every piece that was made separately or added after the main body: head, body, limbs, ears, muzzle, tail, appliques, hair, clothing, and embroidered details.
Then separate what is structural from what is decorative. Structural pieces affect balance, shape, or how the character sits. Decorative pieces refine personality but usually do not hold the project together. This distinction helps you decide what needs precise placement instructions and what can allow more maker choice.
For example, a teddy bear's legs determine whether it sits upright. Their placement needs stitch counts, alignment points, and a clear sewing method. Blush embroidery does not need that level of engineering. It may only need a placement range and a photo reference.
Your assembly map is not a list of everything you made. It is a plan for how a customer moves from loose crochet pieces to a finished, recognizable design.
Build a Component Inventory First
Create a complete inventory before deciding the sewing order. Give each component a consistent name that matches the name used throughout the pattern. If you call a piece "small ear" in the materials page, do not switch to "inner ear" or "ear flap" during assembly unless those are genuinely different parts.
For each component, record four practical details: how many the maker needs, whether it is stuffed, where it attaches, and whether it must be positioned before another piece. This immediately exposes dependencies.
A muzzle may need to be attached before the eyes are embroidered. Arms may need to be sewn before a jacket is added. A tail may be easier to secure before the body is closed or before a skirt covers its placement point. These are not minor production details. They shape the order your customer needs to follow.
It helps to group pieces by location rather than by the order you crocheted them. Head pieces belong together. Body attachments belong together. Finishing details come last unless they must be completed earlier for access. This makes the final assembly section easier to scan when a maker has pieces spread across their work surface.
Name left and right from the character's perspective
This small decision prevents a surprising number of support messages. State that left and right refer to the amigurumi's left and right, not the maker's view. Use the same orientation in every placement note, image label, and assembly diagram.
If two pieces are mirrored, label them clearly during design and testing. A placement map only works when the reader can identify which piece belongs where.
Choose an Assembly Order That Protects Access
The best assembly sequence is rarely the order in which you crocheted the pieces. It is the order that gives the maker the best access to every attachment point and lets them correct placement before details hide the work.
Start with the largest structural connection, such as joining the head to the body if those pieces were made separately. Next, attach pieces that establish the silhouette: legs, arms, ears, wings, tail, or horns. Then add layered facial elements, clothing, small appliques, and embroidery.
There are exceptions. If safety eyes must be installed through a muzzle panel, they need to happen before that panel is sewn on. If a garment cannot fit over attached arms, put it on first. If a tail needs to be hidden inside a body seam, attach it while the seam is open. Your map should follow the logic of the specific design, not a fixed template.
Write the reason when an order may feel unexpected. A short line such as, "Attach the arms before the overalls so the stitches are covered by the straps," gives the customer confidence that the sequence is intentional.
How to Map Pattern Assembly With Placement Anchors
"Sew the ears to the head" is not assembly guidance. It leaves the most important decision to guesswork. Instead, give the maker anchors they can find on their own work.
The most useful anchors are round numbers, stitch positions, center lines, color changes, and physical landmarks. For symmetrical pieces, describe both the vertical and horizontal placement. For instance: position each ear between rounds 8 and 15, with the inner edge six stitches from the center of the face.
When exact stitch counts are hard to communicate, combine measurements with visual alignment. You might say that the top of each arm aligns with round 20 and sits one stitch behind the body's side center. This creates a repeatable target without pretending every crocheter's stuffing or tension will behave identically.
Use pins or removable stitch markers as part of the instruction, not as an optional afterthought. Tell the maker to pin both pieces, view the character from the front and side, adjust for symmetry, and only then sew. This is especially valuable for eyes, ears, limbs, and facial features, where a one-stitch shift can change the expression.
Show the attachment line, not only the destination
Placement tells the customer where a piece starts. They also need to know how it connects. Explain whether to whipstitch through both loops, stitch through the body and the piece, use mattress stitch, or sew around only part of the edge.
For limbs, specify whether they should be flat against the body, angled forward, or lightly movable. For ears or wings, say whether to catch a few stitches at the base or secure the full perimeter. The attachment method changes the finished pose and durability.
Treat Symmetry as a Quality Check
Amigurumi is handmade, so perfect symmetry is not always the goal. Intentional symmetry is. Your pattern should help makers assess the overall expression before they commit with yarn and knots.
Build checkpoints into the assembly instructions. After pinning ears, ask the maker to check that they sit at the same height when viewed from the front. After attaching legs, ask them to place the character on a flat surface and confirm it can sit as designed. After embroidering facial details, ask them to view the face from arm's length rather than only inches away.
These checks make the pattern more forgiving. They also teach customers how to make decisions rather than blindly follow a sequence. That improves their finished result and protects the perceived quality of your design.
Write Assembly Instructions in Small, Testable Actions
A dense paragraph of sewing directions is difficult to follow with a needle in hand. Break each assembly task into short actions: position, pin, check, sew, secure, and weave in ends. Keep the language active and concrete.
Instead of writing, "Attach the arms evenly to the sides of the body," write what evenly means in this design. Identify the rounds, the number of stitches between the arms, the intended angle, and the stitch method. If light stuffing is required before closing a piece, say so at the exact moment it matters.
Photos and 3D views are especially useful for showing angles that written instructions struggle to describe. A front view can confirm spacing, while a side view can show whether the muzzle projects forward or the tail sits at the back center. In Amigurumake you can see the pieces placed on each other before anything is crocheted, which makes it easier to catch a crowded face, uneven limbs, or a hidden attachment point before testers find it.
Test the Map, Not Just the Crochet
A sample can prove that the rounds produce the right shape. It does not prove that your assembly instructions are clear. Ask testers to follow the pattern without relying on your finished sample as a private reference.
Pay attention to where they pause. If multiple testers ask where an ear begins, your anchor is too vague. If they attach arms at different angles, the instruction needs a clearer orientation or image. If they finish successfully but their character cannot sit, revisit both placement and stuffing guidance.
Use feedback to improve the map in layers. First fix missing structural information. Then clarify terminology and sequence. Finally, refine photos, labels, and finishing notes. This order keeps you focused on what affects the finished project most.
A well-mapped assembly section does more than prevent mistakes. It turns your original construction choices into a repeatable customer experience. When each piece has a place, each step has a reason, and each checkpoint gives the maker confidence, your pattern is ready to carry your design beyond your own hands.
Common Questions
How do you write assembly instructions for an amigurumi pattern?
Give every piece four things: where it goes, in what order, at what angle, and how it is sewn. Name the location with anchors the maker can count on her own work, such as a round number and a stitch position, rather than words like "the sides". Then add a checkpoint before she sews, so she can confirm placement while it is still pinned.
Where should amigurumi arms be attached?
Wherever your design puts them, stated precisely enough to repeat: the round the top of the arm sits on, how many stitches separate the two arms, and whether they lie flat, angle forward or stay movable. A photo from the front and one from the side settle what the words cannot.
How do I attach an amigurumi head to the body?
Say whether the head is sewn on or worked continuously, which round of each piece meets the other, and whether the head should be stuffed firmly first so it does not wobble. Tell the maker to pin it, check it from the front and the side, and only then sew around the full edge.
Should left and right be from the maker's view or the doll's?
The doll's, and say so once at the start of the assembly section. Then use the same convention in every note, photo label and diagram. Mixing the two is one of the most common reasons makers attach a mirrored piece on the wrong side.
In what order should amigurumi pieces be assembled?
Usually the largest structural join first, then the pieces that set the silhouette, then facial details, clothing and embroidery. The exceptions are the whole point of writing it down: safety eyes that go through a muzzle, a tail hidden in an open seam, a garment that will not fit over attached arms. When the order looks unusual, give the reason in one line.
How can I tell if my assembly instructions are clear?
Watch where testers pause. If several ask where an ear begins, the anchor is too vague; if their arms end up at different angles, the orientation is missing. Ask testers to work from the pattern alone, without your sample as a private reference.